Support Wikipedia Follow My Heart: Windows
显示标签为“Windows”的博文。显示所有博文

2011年12月4日星期日

在日本买的笔记本电脑是日语Windows7外加日语键盘,怎么办?

我相信很多在国外的同学都跟我有一样的烦恼,买台笔记本,不但是外语windows,还是外语键盘布局,即使装了中文输入发,打出来的标点符号也跟键盘上面印的不一样,非常不方便。
虽然Microsoft网站上说Professional版本的Windows (Vista, 7 ..) 允许直接通过Windows Update在线下载和修改Windows界面语言,但是对于大多数只能用Home版的苦逼大众,只能望洋兴叹了。
不过好消息是通过下面的非官方方法(虽然是非官方,但是并不违法),可以解决这两个问题。
*******************************************************************************************************************************************************

1,Windows Home版界面语言修改


For example,   English Windows7   -->   Chinese Windows 7
原文请参阅链接: http://www.metsky.com/archives/350.html
以下为转载内容:
按照微软官方规定,非旗舰版的Vista/Windows 7都是不提供多语言升级切换的,所以要想升级更换语言包必须使用第三方工具,本文演示使用Vistalizator将Windows 7家庭高级版从英文语言显示更换为中文语言,Vista/Windows 7其它版本都可类似参考操作,包括Vista/Windows 7初级版、家庭基础版、家庭增强或称高级版、商业版、专业版等版本,天缘全文测试通过。
一、Vistalizator下载和MUI语言包
1、Vistalizator和MUI语言包下载
Vistalizator下载网址:http://www.froggie.sk /,下载地址点击下载
支持Vista/Windows 7初级版、家庭基础版、家庭增强版和商业版/专业版语言切换,而按照微软官方约定,这些版本都是不支持多语言切换的。
默认Vistalizator,其它意大利语、阿拉伯语、葡萄牙语等总共9种语言(没有中文语言版本),可以下载点击下载,下载该语言包之后,然后解压到上面下载Vistalizator.exe同级目录。
Windows 7 x86中文语言包:微软官方下载,更多其它MUI语言包请先参考:http://www.froggie.sk/7lp32rtm.html, 请注意,下载语言包需要适合你的系统版本。
Windows 7 x64中文语言包:微软官方下载,更多其它MUI语言包请先参考:http://www.froggie.sk/7lp64rtm.html, 请注意,下载语言包需要适合你的系统版本。
另外还有LIP语言包,区别在于MUI语言是完整的语言包,LIP语言包只是基础语言包,请优先使用MUI语言包。
2、语言包的两种安装模式:
1、内部安装模式(Internal Installation mode)
该安装模式特点如下:不排除在某些系统上安装某些MUI语言包会有问题,但是LIP语言包是没有问题的,内部安装模式是使用Windows内置语言安装器进行安装,对Windows更新更加友好,对于MUI语言包只能安装一次,对LIP语言包没有限制。内部安装模式的时间要长一些,大概20分钟(MUI),LIP包大概10分钟。考虑到兼容性问题,天缘建议你最好先尝试内部安装模式。
2、扩展安装模式(Express Installation mode)
扩展安装模式执行的是通过快速清理方法安装新语言,不能更新全部的windows系统日志,所以该方法可能会导致Windows在更新某些补丁时无法识别语言。这些Windows更新不得不使用Vistalizator进行手动更新。相比内部安装模式,安装时间更短一些,而且可以放心使用,除非你升级到语言到SP1,否则安装过程不会覆盖任何文件。如果使用内部安装模式感觉有问题,可以使用扩展安装模式。
注意:如果你的系统是Vista/Windows Ultimate旗舰版,可以采用在线或离线语言包直接安装,具体可参考:
Windows 7多国语言包 + 安装向导(图文)
二、为Windows 7升级中文语言包
注:Vista/Windows 7其它版本、其它语言更新类似操作。
1、安装Windows 7语言包
A、下载完Vistalizator和语言包之后,然后在管理员权限下执行,如下图(鼠标右键选择Run as administrator)。

B、Vistalizator运行界面如下图,点击Add languages:

C、然后选择上文下载MUI语言包,并点击确定,出现以下装载界面: 

D、语言包装载完成后,如下图,会提示Express模式安装警告,因为在扩展安装模式下安装语言包可能会影响到Windows更新,所以建议你优先尝试内部安装模式interanl installation mode,点击确定。

E、然后点击下图种的方框位置,会自动切换为Internal模式,(如果Internal内部模式安装失败时,再采用扩展模式进行安装),点击Install language。

F、内部模式安装大概20分钟左右,扩展模式会快一点,天缘实测是内部模式似乎也没那么久,很快久安装完成了,如下图:

G、安装完中文语言包后,会有切换显示提示,点击YES,如下图:

H、点击关闭按钮会提示重启系统,我们知道在Windows 7旗舰版上,切换语言只需要注销即可显示,不过这里还是遵守软件约定,最好重启一下机子。如下窗口:

I、重启后,Windows 7已经变成中文语言显示,天缘实测通过,如果再想把语言切换回去,只需要再次运行Vistalizator,如下图:

J、选择非当前显示语言(图中是English英文),然后点击Change language即可,如下图,再重启即可生效。

2、升级完语言后,可能有些地方需要手动修改一下,请注意检查以下几个位置,如果只需要手动修改即可:
A、 修改键盘布局、位置标准和格式:控制面板——时钟、语言和区域
B、修改Internet浏览器默认语言:开始菜单——程序组——工具——internet选项——TAB标签语言
C、修改剪贴板字体:开始菜单——程序组——格式——字体
D、重命名网络连接:控制面板——网络和INTERNET连接——网络和共享中心——管理网络连接。
3、补充语言包的升级问题
如果你是采用Express扩展模式安装语言包,以后升级语言只需要使用Vistalizator上图右下角的Update languages即可,Vistalizator会自动下载最新的语言包,并安装之,Internal mode安装的用户则不需要使用,因为Vista/Windows 7更新会自动识别语言版本。
*******************************************************************************************************************************************************

2,中文输入法与外语键盘的正确对应


For example,   Japanese 106/109 Keyboard  Vs.  Google Chinese Input

Something IMPORTANT:

  1. 如果计算机上有多个用户,那么可能你需要修改好几个地方的注册表键值。也就是说在注册表的目录里面,”HKEY_LOCAL_MACHINE”->“SYSTEM”下面有好几个”ControlSet…”文件夹。如果你不确定到底哪一个文件夹对应哪一个用户,那就全部都改一遍吧。
  2. 请务必确认计算机硬件管理器里面,登记的键盘类型是对应的键盘(比如日语的话就是106/109键盘,或109键盘)。我的台式机上面是HID Keyboard (HID キーボード),必须更换。可以选择Toshiba的键盘。


原文请参阅链接:http://www.51nb.com/forum/viewthread.php?tid=802920
以下为转载内容:

当您在一台装有日语键盘的计算机上使用的时候,您是否会觉得,打字的时候明明看着要打出“{”符号,结果按下去出现的却是“}”符号的现象呢。其实不只是这两个括号的问题,由于日语的键盘布局和英语的键盘布局在众多符号方面存在比较大的差异,您往往会在使用中觉得非常不方便,甚至忍无可忍。
  现在,就请让我来告诉您,怎么做才能够让您在日语键盘上按照正确的方法输入字符吧。
  那么现在开始咯,请一步一步按照我写的来操作。
  
首先进入修改键盘配置的硬件设置部分。
  请进入“控制面板”,点击“系统”。在打开的系统属性框的上方,点击“硬件”标签。然后点击“设备管理器”,进入设备管理画面。在设备管理画面中,找到“键盘”。它现在可能显示成为“标准 101/102键或 Microsoft 自然 PS/2 键盘”,也可能显示成为别的类型。请确信您要把它修改成标准日语键盘之后,再继续下面的步骤。
  现在,右键点击这个键盘类型,选择“更新驱动程序(P)...”,然后在被询问是否要连接到 Windows Update 的时候,选择“否,暂时不”,并按“下一步”。此时,请选择“从列表或指定位置安装(高级)”,并按“下一步”。然后,请选择“不要搜索。我要自己选择要安装的驱动程序。”,并按“下一步”。
  现在,到了修改键盘硬件设置的最后一步。在这里,你可能只能看到一个类型可以被选择,也就是“标准 101/102键或 Microsoft 自然 PS/2 键盘”。此时你需要把上面的“显示兼容硬件”前的勾去掉。然后在下方,把左边的得厂商列表一直拉到最上部,选择“(标准键盘)”,并且在右边的型号列表中选择“Japanese PS/2 Keyboard (106/109 Key)”,并点击“下一步”。此后,Windows将出现警告,提醒您是否要继续安装这个驱动程序,请选择“是”。紧接着,Windows将再次出现一个关于是否替换 PS/2 mouse port 设备的警告,请再次选择“是”。
  稍等片刻后,将会出现“完全硬件更新向导”的画面。请先保存您的此时未完成的所有工作和程序,当您点击“完成”后,将会要求重新启动机器。
  至此,日语的键盘布局的硬件配置部分修改完毕。重新启动机器后让我们进入软件配置部分。
  
在重新启动机器的过程中,让我们来回忆一下自己平时对输入法的各种使用体会吧。一般的方块文字输入系统都表现为两种使用状态。英语输入状态和方块文字输入状态。这里用中文的微软拼音输入法 2003 和日语的 Microsoft IME Standard 2002 来做例子。对于中文,是使用 shift 键来切换这两种状态,而对于日语是使用日语键盘特有的左上角 半角/全角 这个键来切换这两种状态的。
  我们修改的目的,就是要在这两种输入法,总共四种输入状态中,把键盘的布局全部修改成日语键盘的布局方式。之前的硬件配置部分完成后,我们已经把您的计算机上日语的两种输入状态中,键盘布局修改成日语的模式了。如果您觉得没有必要修改中文的布局模式的话,到此为止就可以了。如果在中文输入的时候,对于键盘的分布和自己的输入结果有差异而感到不满的话,请继续看下去并按照我说的来修改。
  
好了,您的机算机应该重新启动完毕了吧。让我们继续软件部分的修改。
  点击“开始”,点击“运行...”,输入“regedit”,并点击“确定”。进入注册表编辑器。
  依顺序进入“HKEY_LOCAL_MACHINE”->“SYSTEM”->“ControlSet001”->“Control”->“Keyboard Layouts”。
  在左边长长的列表中往下慢慢的拉,找到“00000804”,点击之后,双击右边的“LayourFile”,把其中的“KBDUS.DLL”修改成“KBDJPN.DLL”。这一步就是把中文输入法的英语输入状态下的键盘布局修改成日语的键盘布局模式。如果您愿意的话,可以把“Layout Text”修改成“中文(简体)-日式键盘”
  然后继续回到左边,往下拉。找到“E00E0804”,重复上面的步骤,把右边的“LayourFile”修改成“KBDJPN.DLL”即可。这一步是把微软拼音输入法 2003的中文输入状态下键盘的布局模式修改成日语布局。
  如果您使用的不是微软拼音输入法 2003,请参照下面的列表找到您适用的修改区域。如果没有找到,也没有关系,一般来说,简体中文输入法的区域,最后四位总是“0804”,很容易就可以找到的。
至此,所有的修改已经完毕,请重新启动您的计算机,您所做的修改会在重新启动会体现。
请注意,您的键盘将应为您所做的修改,而具有所有日语键盘的特性。包括直接按下“caps lock”切换大小写的功能将被日语键盘特有的同时按下“caps lock”+“shift”所替代。

输入法注册表区域参照
E00E0804 中文 (简体) - 微软拼音输入法 3.0 版(或微软拼音输入法 2003)
E0050804 中文 (简体) - 内码
E0040804 中文 (简体) - 智能 ABC
E0030804 中文 (简体) - 郑码
E0020804 中文 (简体) - 双拼
E0010804 中文 (简体) - 全拼
其他新开发的输入法都可以依此类推。
(补充)
E0200804  中文(简体)-谷歌拼音

2011年11月25日星期五

How to browse the fields of WMI Classes

We can use SQL-like language to query system-level information (including performance information) by WMI.

But the problem is that new users do not know what the definition of 'SQL Tables'. What kind of "Columns" do they have?

So it is very necessary for new users to check the content of each WMI classes.

******************************************************************************
Step 1: Run WBEMTEST.
(You can invoke it by inputting the name into Windows Start -> Run Dialog Box)

Step 2: Click the [Connection] Button, then you can see a jump-out dialog.

Step 3: In this [Connection] Dialog, change the Namespace (in the textfield) to "root\cimv2", and then click [Connect]. Then you find yourself retured back.

Step 4: Now click the [Enum Classes] button. And then choose [Recursive] Radio button with leaving the main text field blank. Then click [OK].

Step 5: Now you can see that all WMI Classes (e.g. Win32_System) are listed in the new Jump-out window. Now you can browse them using the scollbar.

Step 6: If you want to check the fields of certain class, just double-click it from the list. then you can browse its detailed information in a new window.


Use PerfMon to Find why your Windows Computer is Slow

I found a valuable post in other people's blog.
I think the knowledge about PerfMon (a tool embedded in Windows, majoring in System Performance Browse) can help you determine the bottleneck of your PC.


*********************************************************************************

Windows Perfmon: The Top Ten Counters

One of the things I love about Windows is Performance Monitor a/k/a PerfMon. It's an amazing tool that goes far too often unused - and when it does get used, it is often misinterpreted. So today I'm going to take you on the nickel tour through PerfMon, and the ten counters most valuable to determining overall system health and activity.

To open PerfMon, just go to the Start Menu, choose Run and type perfmon.
Bottleneck analysis
The most common use of PerfMon is to answer the burning question: why is my system running slow?

With the five performance counters listed below, you can quickly get an overall impression of how healthy a system is - and where the problems are, if they exist. The idea here is to pick counters that will be at low or zero values when the system is healthy, and at high values when something is overloaded. A 'perfectly healthy' system would show all counters flatlined at zero. (Perfection is unattainable, so you'll probably never see all of these counters flatlined at zero in real life. The CPU will almost always have a few items in queue.)
  • Processor utilization
    • System\Processor Queue Length - number of threads queued and waiting for time on the CPU. Divide this by the number of CPUs in the system. If the answer is less than 10, the system is most likely running well.
  • Memory utilization
    • Memory\Pages Input/Sec - The best indicator of whether you are memory-bound, this counter shows the rate at which pages are read from disk to resolve hard page faults. In other words, the number of times the system was forced to retreive something from disk that should have been in RAM. Occasional spikes are fine, but this should generally flatline at zero.
  • Disk Utilization
    • PhysicalDisk\Current Disk Queue Length\driveletter - this is probably the single most valuable counter to watch. It shows how many read or write requests are waiting to execute to the disk. For single disks, it should idle at 2-3 or lower, with occasional spikes being okay. For RAID arrays, divide by the number of active spindles in the array; again try for 2-3 or lower. Because a shortage of RAM will tend to beat on the disk, look closely at the Memory\Pages Input/Sec counter if disk queue lengths are high.
  • Network Utilization
    • Network Interface\Output Queue Length\nic name - is the number of packets in queue waiting to be sent. If there is a sustained average of more than two packets in queue, you should be looking to resolve a network bottleneck.
    • Network Interface\Packets Received Errors\nic name - packet errors that kept the TCP/IP stack from delivering packets to higher layers. This value should stay low.
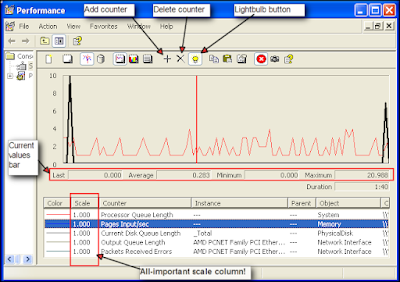
To highlight a particular counter's line on the graph, select that counter in the lower pane. Then click the lightbulb icon on the toolbar above the graph. This will make the line for that counter turn thick and white (or black on some systems - I never found out why this changes).

Pay close attention to the scale column! Perfmon attempts to automatically pick a scale that will magnify or reduce the counter enough to produce a meaningful line on the graph ... but it doesn't always get it right. As an example, Perfmon often chooses to multiply Disk Queue Length by 100. So, you might think the disk queue length is sustained at 10 (bad!) when in fact it's really at 1 (good). If you're not sure, highlight the counter in the lower pane, and watch the Last and Average values just below the graph. In the screenshot below, I modified all of the counters to a scale value of 1.0, then changed the graph's vertical axis to go from 0-10.
To change graph properties (like scale and vertical axis as discussed above), rightclick the graph and chooseProperties. There are a number of things to customize here ... fiddle with it until you have a graph that looks good to you.
To get a more detailed explanation of any counter, rightclick anywhere in the perfmon graph and choose Add Counters. Select the counter and object that you are curious about, and click the Explain button.
This screenshot shows a very lightly-loaded XP system, with the Memory\Pages Input/Sec counter highlighted:
Click for larger image


All we see here is the Proccessor Queue Length hovering between 1 and 4, and two short spikes of Pages Input/Sec. All other counters are flatlined at zero, which is easy to check by highlighting each of them and watching the values bar underneath the graph. This is a happy system - no problems here!
But if we saw any of the above counters averaging more than 2-4 for long periods of time (except Processor Queue Length: don't worry unless it's above 10 for long lengths of time), we'd be able to conclude that there was a problem with that subsystem. We could then drill down using more detailed counters to see exactly what was causing that subsystem to be overloaded. More detailed analysis is beyond the scope of this article, but if there's enough interest I could do a second article on that. Leave a comment if you're interested!
General activity counters
Well, the system is healthy - and that's good ... but how hard is it working? Is the processor workin' hard, or hardly workin'? How much RAM is in use, how many bytes are being written to or read from the disk or network? The following counters are a good overview of general activity of the system.
  • Processor utilization
    • Processor\% Processor Time\_Total - just a handy idea of how 'loaded' the CPU is at any given time. Don't confuse 100% processor utilization with a slow system though - processor queue length, mentioned above, is much better at determining this.
  • Memory utilization
    • Process\Working Set\_Total (or per specific process) - this basically shows how much memory is in the working set, or currently allocated RAM.
    • Memory\Available MBytes - amount of free RAM available to be used by new processes.
  • Disk Utilization
    • PhysicalDisk\Bytes/sec\_Total (or per process) - shows the number of bytes per second being written to or read from the disk.
  • Network Utilization
    • Network Interface\Bytes Total/Sec\nic name - Measures the number of bytes sent or received.
In the graph below, I added these five counters to my existing 'bottlenecks' graph, and changed the vertical axis to go from 0-100. I highlighted the Working Set\_Total counter, which is currently at about 123 megabytes for the system. Notice how it shows a thick line at the top of the graph - you could assume that it was pegged at 100, if you didn't read the values bar (123,052,03 divided by a million is approximately 123 megabytes).
Click for larger image

And ... that's all for now. Hopefully this quick show-and-tell has given you enough information to use PerfMon more usefully in the future!

2011年10月5日星期三

WMIC Examples

I copied this post from Support.Microsoft


Powerful Windows Command Line Tool -- WMIC

I copied this post from Xiaogui03.


1.wmic=Microsoft Windows Management Instrumentation


2. C:\WINDOWS\system32\wbem 下的东西,特别是.xsl格式化文件,实现wmic的格式化输出
如wmic /output:c:\process.html process list /format:htable.xsl
/format:textvaluelist.xsl
/format:hform.xsl
/format:htable.xsl
/format:csv.xsl
/format:xml.xsl

3.wmic可以做什么?系统管理、远程主机信息获取。。。都可以

4.wmic /?
查看wmic对象有何可用属性: wmic 对象名称 get /?   例如wmic process get /?

查看wmic对象某个属性的值: wmic 对象名称 get 对象某个属性   例如 
wmic process get name


PROCESS - 进程管理
::列出进程的核心信息,类似任务管理器
wmic process list brief
::新建notepad进程
wmic process call create notepad
::列出进程的信息
wmic process get caption,handle,commandline,executablepath
::结束进程
wmic process [handle/PID] delete
wmic process [handle/PID] call terminate
::结束svchost.exe进程,路径为非C:\WINDOWS\system32\svchost.exe的
wmic process where "name='svchost.exe' and ExecutablePath<>'C:\\WINDOWS\\system32\\svchost.exe'" call Terminate
::结束svchost.exe进程,路径为C:\WINDOWS\svchost.exe的(关键点:路径中的\一定要换成\\)
wmic process where "name='svchost.exe' and ExecutablePath='C:\\WINDOWS\\svchost.exe'" call Terminate

BIOS - 基本输入/输出服务 (BIOS) 管理
::查看bios版本型号
wmic bios get name,SMBIOSBIOSVersion,manufacturer


COMPUTERSYSTEM - 计算机系统管理
::查看硬件、操作系统基本信息wmic computersystem get Name,workgroup,NumberOfProcessors,manufacturer,Model
::查看系统启动选项boot.ini的内容
wmic computersystem get SystemStartupOptions
::查看工作组/域
wmic computersystem get domain
::更改计算机名abc为123
wmic computersystem where "name='abc'" call rename 123
::更改工作组google为MyGroup
wmic computersystem where "name='google'" call joindomainorworkgroup "","","MyGroup",1

CPU - CPU 管理
::查看cpu型号
wmic cpu get name


DATAFILE - DataFile 管理
::查找e盘下test目录(不包括子目录)下的cc.cmd文件
wmic datafile where "drive='e:' and path='\\test\\' and FileName='cc' and Extension='cmd'" list
::查找e盘下所有目录和子目录下的cc.cmd文件,且文件大小大于1K
wmic datafile where "drive='e:' and FileName='cc' and Extension='cmd' and FileSize>'1000'" list
::删除e盘下文件大小大于10M的.cmd文件
wmic datafile where "drive='e:' and Extension='cmd' and FileSize>'10000000'" call delete
::删除e盘下test目录(不包括子目录)下的非.cmd文件
wmic datafile where "drive='e:' and Extension<>'cmd' and path='test'" call delete
::复制e盘下test目录(不包括子目录)下的cc.cmd文件到e:\,并改名为aa.bat
wmic datafile where "drive='e:' and path='\\test\\' and FileName='cc' and Extension='cmd'" call copy "e:\aa.bat"
::改名c:\hello.txt为c:\test.txt
wmic datafile "c:\\hello.txt" call rename c:\test.txt
::查找h盘下目录含有test,文件名含有perl,后缀为txt的文件
wmic datafile where "drive='h:' and extension='txt' and path like '%\\test\\%' and filename like '%perl%'" get name


DESKTOPMONITOR - 监视器管理
::获取屏幕分辨率
wmic DESKTOPMONITOR where Status='ok' get ScreenHeight,ScreenWidth

DISKDRIVE - 物理磁盘驱动器管理
::获取物理磁盘型号大小等
wmic DISKDRIVE get Caption,size,InterfaceType


ENVIRONMENT - 系统环境设置管理
::获取temp环境变量
wmic ENVIRONMENT where "name='temp'" get UserName,VariableValue
::更改path环境变量值,新增e:\tools
wmic ENVIRONMENT where "name='path' and username='<system>'" set VariableValue="%path%;e:\tools"
::新增系统环境变量home,值为%HOMEDRIVE%%HOMEPATH%
wmic ENVIRONMENT create name="home",username="<system>",VariableValue="%HOMEDRIVE%%HOMEPATH%"
::删除home环境变量
wmic ENVIRONMENT where "name='home'" delete


FSDIR - 文件目录系统项目管理
::查找e盘下名为test的目录
wmic FSDIR where "drive='e:' and filename='test'" list
::删除e:\test目录下除过目录abc的所有目录
wmic FSDIR where "drive='e:' and path='\\test\\' and filename<>'abc'" call delete
::删除c:\good文件夹
wmic fsdir "c:\\good" call delete
::重命名c:\good文件夹为abb
wmic fsdir "c:\\good" rename "c:\abb"


LOGICALDISK - 本地储存设备管理
::获取硬盘系统格式、总大小、可用空间等
wmic LOGICALDISK get name,Description,filesystem,size,freespace

NIC - 网络界面控制器 (NIC) 管理


OS - 已安装的操作系统管理
::设置系统时间
wmic os where(primary=1) call setdatetime 20070731144642.555555+480

PAGEFILESET - 页面文件设置管理
::更改当前页面文件初始大小和最大值
wmic PAGEFILESET set InitialSize="512",MaximumSize="512"
::页面文件设置到d:\下,执行下面两条命令
wmic pagefileset create name='d:\pagefile.sys',initialsize=512,maximumsize=1024
wmic pagefileset where"name='c:\\pagefile.sys'" delete


PRODUCT - 安装包任务管理
::安装包在C:\WINDOWS\Installer目录下
::卸载.msi安装包
wmic PRODUCT where "name='Microsoft .NET Framework 1.1' and Version='1.1.4322'" call Uninstall
::修复.msi安装包
wmic PRODUCT where "name='Microsoft .NET Framework 1.1' and Version='1.1.4322'" call Reinstall


SERVICE - 服务程序管理
::运行spooler服务
wmic SERVICE where name="Spooler" call startservice
::停止spooler服务
wmic SERVICE where name="Spooler" call stopservice
::暂停spooler服务
wmic SERVICE where name="Spooler" call PauseService
::更改spooler服务启动类型[auto|Disabled|Manual] 释[自动|禁用|手动]
wmic SERVICE where name="Spooler" set StartMode="auto"
::删除服务
wmic SERVICE where name="test123" call delete


SHARE - 共享资源管理
::删除共享
wmic SHARE where name="e$" call delete
::添加共享
WMIC SHARE CALL Create "","test","3","TestShareName","","c:\test",0

SOUNDDEV - 声音设备管理
wmic SOUNDDEV list


STARTUP - 用户登录到计算机系统时自动运行命令的管理
::查看msconfig中的启动选项
wmic STARTUP list

SYSDRIVER - 基本服务的系统驱动程序管理
wmic SYSDRIVER list


USERACCOUNT - 用户帐户管理
::更改用户administrator全名为admin
wmic USERACCOUNT where name="Administrator" set FullName="admin"
::更改用户名admin为admin00
wmic useraccount where "name='admin" call Rename admin00


------------------------------------------------------------------------------------------------------------------------------------------------
As you see, to get information, you just need to know an alias for the component you are interested in. Unlike scripting where you would need to know a specific class name, you can get by with a simple name. At the wmic prompt, type in 'cpu'. You will get a report of cpu properties that scrolls off the screen. Typing 'cpu list brief' will return a subset of information. But it is still hard to read. For a better report, type 'cpu list /format:textvaluelist'. Other formatting options include CSV (/format:csv),raw XML (/format:rawxml), an HTML table (/format:htable) or an HTML page (/format:hform). If you want to save the output to a file, you can use the /Output switch. You can send output to the Windows clipboard (/Output:clipboard) or a file (/Output:osreport.csv). Be aware that you must put the output switch first in the command. For example, at the prompt type '/output:osreport.htm os list full /format:hform'. You can then open the file osreport.htm in any browser. If you specify a file name with spaces, you must enclose the name in quotes " ".

WMIC is nice but it's real power comes in managing remote systems. At the beginning of your command, simply use /node:servername, like this:

/node:FileSrv01 /output:c:\reports\filesrv01-cpu.htm cpu list /format:hform.

If you want to query multiple remote systems, separate computer names with commas (/node:computer1,computer2,computer3). Depending on the query you might also need to pass alternate credentials. At the beginning of the command, use /User and /Password. You can't use different credentials for local systems. Here is a more complete interactive example (this is one single line command from a wmic prompt):

/user:mydomain\Admin09 /password:P@ssw0rd node:FileSrv01,FileSrv02
/output:c:\reports\filesrv01-cpu.htm cpu list /format:hform
.

I mentioned that you can also run commands directly from the command line. All you need to do is type wmic and then the wmic command you tested interactively:

wmic /node:FileSrv01 /output:c:\reports\filesrv01-cpu.htm cpu list /format:hform.

That's all there is to it. As I mentioned, WMIC can be a very useful utility and there is much more to it than I can cover here. In the mean time, open up a command prompt and try these commands to see for yourself. Don't worry, no changes will be made to your system, just a report of some local resources and elements. Depending on your system, some commands will provide more values than others.

wmic cpu list /format:textvaluelist
wmic os list /format:textvaluelist
wmic /output:mypc.htm computersystem list /format:hform [open mypc.htm in browser after you exit wmic to see the results]
wmic logicaldisk list brief /format:textvaluelist
wmic csproduct list /format:textvaluelist