
Last week, I bought a new notebook computer, made by LENOVO, G570.
I was glad the CPU is INTEL i5 (Mobile) because I heard it was good.
However, when I open the "Window7 Troubleshooting", it told me "the architecture of your System is AMD64"! Oh, god, was I cheated by the seller?
********************************************************************************
After investigation, I found that "AMD64" does not necessarily mean that your CPU is made by AMD.
Actually, AMD is the first company which fully developed the 64-bit CPU instruction set. At that time, INTEL still sticks on its 32-bit CPU design.
After that, INTEL found that it has been surpassed by AMD, so INTEL focused much time and money on developing 64-bit CPU.
Although INTEL catches up quickly, no one can deny the truth that AMD made the first successful 64-bit CPU. Also some relative techniques and specifications for 64-bit designed by AMD become the common standard for future 64-bit CPU development. The industrial world call these basic technologies and standards as "AMD64".
So that is why I say the "architecture" of your INTEL CPU might also be "AMD64".
********************************************************************************
Both AMD and INTEL have developed a lot of CPUs from then. Also INTEL has formed its own standard, the "x86-64" series and "INTEL 64". The former has a compatibility instruction set which can work on both 32-bit CPU and 64-bit CPU. The Later is pure 64-bit CPU, but different from "Classical 64-bit CPU Design", which is called "AMD64".
2011年12月7日星期三
2011年12月4日星期日
在日本买的笔记本电脑是日语Windows7外加日语键盘,怎么办?
我相信很多在国外的同学都跟我有一样的烦恼,买台笔记本,不但是外语windows,还是外语键盘布局,即使装了中文输入发,打出来的标点符号也跟键盘上面印的不一样,非常不方便。
虽然Microsoft网站上说Professional版本的Windows (Vista, 7 ..) 允许直接通过Windows Update在线下载和修改Windows界面语言,但是对于大多数只能用Home版的苦逼大众,只能望洋兴叹了。
不过好消息是通过下面的非官方方法(虽然是非官方,但是并不违法),可以解决这两个问题。
*******************************************************************************************************************************************************
For example, English Windows7 --> Chinese Windows 7
原文请参阅链接: http://www.metsky.com/archives/350.html
以下为转载内容:
虽然Microsoft网站上说Professional版本的Windows (Vista, 7 ..) 允许直接通过Windows Update在线下载和修改Windows界面语言,但是对于大多数只能用Home版的苦逼大众,只能望洋兴叹了。
不过好消息是通过下面的非官方方法(虽然是非官方,但是并不违法),可以解决这两个问题。
*******************************************************************************************************************************************************
1,Windows Home版界面语言修改
For example, English Windows7 --> Chinese Windows 7
原文请参阅链接: http://www.metsky.com/archives/350.html
以下为转载内容:
按照微软官方规定,非旗舰版的Vista/Windows 7都是不提供多语言升级切换的,所以要想升级更换语言包必须使用第三方工具,本文演示使用Vistalizator将Windows 7家庭高级版从英文语言显示更换为中文语言,Vista/Windows 7其它版本都可类似参考操作,包括Vista/Windows 7初级版、家庭基础版、家庭增强或称高级版、商业版、专业版等版本,天缘全文测试通过。*******************************************************************************************************************************************************
一、Vistalizator下载和MUI语言包
1、Vistalizator和MUI语言包下载
Vistalizator下载网址:http://www.froggie.sk /,下载地址点击下载
支持Vista/Windows 7初级版、家庭基础版、家庭增强版和商业版/专业版语言切换,而按照微软官方约定,这些版本都是不支持多语言切换的。
默认Vistalizator,其它意大利语、阿拉伯语、葡萄牙语等总共9种语言(没有中文语言版本),可以下载点击下载,下载该语言包之后,然后解压到上面下载Vistalizator.exe同级目录。
Windows 7 x86中文语言包:微软官方下载,更多其它MUI语言包请先参考:http://www.froggie.sk/7lp32rtm.html, 请注意,下载语言包需要适合你的系统版本。
Windows 7 x64中文语言包:微软官方下载,更多其它MUI语言包请先参考:http://www.froggie.sk/7lp64rtm.html, 请注意,下载语言包需要适合你的系统版本。
另外还有LIP语言包,区别在于MUI语言是完整的语言包,LIP语言包只是基础语言包,请优先使用MUI语言包。
2、语言包的两种安装模式:
1、内部安装模式(Internal Installation mode)
该安装模式特点如下:不排除在某些系统上安装某些MUI语言包会有问题,但是LIP语言包是没有问题的,内部安装模式是使用Windows内置语言安装器进行安装,对Windows更新更加友好,对于MUI语言包只能安装一次,对LIP语言包没有限制。内部安装模式的时间要长一些,大概20分钟(MUI),LIP包大概10分钟。考虑到兼容性问题,天缘建议你最好先尝试内部安装模式。
2、扩展安装模式(Express Installation mode)
扩展安装模式执行的是通过快速清理方法安装新语言,不能更新全部的windows系统日志,所以该方法可能会导致Windows在更新某些补丁时无法识别语言。这些Windows更新不得不使用Vistalizator进行手动更新。相比内部安装模式,安装时间更短一些,而且可以放心使用,除非你升级到语言到SP1,否则安装过程不会覆盖任何文件。如果使用内部安装模式感觉有问题,可以使用扩展安装模式。
注意:如果你的系统是Vista/Windows Ultimate旗舰版,可以采用在线或离线语言包直接安装,具体可参考:
Windows 7多国语言包 + 安装向导(图文)
二、为Windows 7升级中文语言包
注:Vista/Windows 7其它版本、其它语言更新类似操作。
1、安装Windows 7语言包
A、下载完Vistalizator和语言包之后,然后在管理员权限下执行,如下图(鼠标右键选择Run as administrator)。
B、Vistalizator运行界面如下图,点击Add languages:
C、然后选择上文下载MUI语言包,并点击确定,出现以下装载界面:
D、语言包装载完成后,如下图,会提示Express模式安装警告,因为在扩展安装模式下安装语言包可能会影响到Windows更新,所以建议你优先尝试内部安装模式interanl installation mode,点击确定。
E、然后点击下图种的方框位置,会自动切换为Internal模式,(如果Internal内部模式安装失败时,再采用扩展模式进行安装),点击Install language。
F、内部模式安装大概20分钟左右,扩展模式会快一点,天缘实测是内部模式似乎也没那么久,很快久安装完成了,如下图:
G、安装完中文语言包后,会有切换显示提示,点击YES,如下图:
H、点击关闭按钮会提示重启系统,我们知道在Windows 7旗舰版上,切换语言只需要注销即可显示,不过这里还是遵守软件约定,最好重启一下机子。如下窗口:
I、重启后,Windows 7已经变成中文语言显示,天缘实测通过,如果再想把语言切换回去,只需要再次运行Vistalizator,如下图:
J、选择非当前显示语言(图中是English英文),然后点击Change language即可,如下图,再重启即可生效。
2、升级完语言后,可能有些地方需要手动修改一下,请注意检查以下几个位置,如果只需要手动修改即可:
A、 修改键盘布局、位置标准和格式:控制面板——时钟、语言和区域
B、修改Internet浏览器默认语言:开始菜单——程序组——工具——internet选项——TAB标签语言
C、修改剪贴板字体:开始菜单——程序组——格式——字体
D、重命名网络连接:控制面板——网络和INTERNET连接——网络和共享中心——管理网络连接。
3、补充语言包的升级问题
如果你是采用Express扩展模式安装语言包,以后升级语言只需要使用Vistalizator上图右下角的Update languages即可,Vistalizator会自动下载最新的语言包,并安装之,Internal mode安装的用户则不需要使用,因为Vista/Windows 7更新会自动识别语言版本。
2,中文输入法与外语键盘的正确对应
For example, Japanese 106/109 Keyboard Vs. Google Chinese Input
Something IMPORTANT:
- 如果计算机上有多个用户,那么可能你需要修改好几个地方的注册表键值。也就是说在注册表的目录里面,”HKEY_LOCAL_MACHINE”->“SYSTEM”下面有好几个”ControlSet…”文件夹。如果你不确定到底哪一个文件夹对应哪一个用户,那就全部都改一遍吧。
- 请务必确认计算机硬件管理器里面,登记的键盘类型是对应的键盘(比如日语的话就是106/109键盘,或109键盘)。我的台式机上面是HID Keyboard (HID キーボード),必须更换。可以选择Toshiba的键盘。
原文请参阅链接:http://www.51nb.com/forum/viewthread.php?tid=802920
以下为转载内容:
当您在一台装有日语键盘的计算机上使用的时候,您是否会觉得,打字的时候明明看着要打出“{”符号,结果按下去出现的却是“}”符号的现象呢。其实不只是这两个括号的问题,由于日语的键盘布局和英语的键盘布局在众多符号方面存在比较大的差异,您往往会在使用中觉得非常不方便,甚至忍无可忍。
现在,就请让我来告诉您,怎么做才能够让您在日语键盘上按照正确的方法输入字符吧。
那么现在开始咯,请一步一步按照我写的来操作。
首先进入修改键盘配置的硬件设置部分。
请进入“控制面板”,点击“系统”。在打开的系统属性框的上方,点击“硬件”标签。然后点击“设备管理器”,进入设备管理画面。在设备管理画面中,找到“键盘”。它现在可能显示成为“标准 101/102键或 Microsoft 自然 PS/2 键盘”,也可能显示成为别的类型。请确信您要把它修改成标准日语键盘之后,再继续下面的步骤。
现在,右键点击这个键盘类型,选择“更新驱动程序(P)...”,然后在被询问是否要连接到 Windows Update 的时候,选择“否,暂时不”,并按“下一步”。此时,请选择“从列表或指定位置安装(高级)”,并按“下一步”。然后,请选择“不要搜索。我要自己选择要安装的驱动程序。”,并按“下一步”。
现在,到了修改键盘硬件设置的最后一步。在这里,你可能只能看到一个类型可以被选择,也就是“标准 101/102键或 Microsoft 自然 PS/2 键盘”。此时你需要把上面的“显示兼容硬件”前的勾去掉。然后在下方,把左边的得厂商列表一直拉到最上部,选择“(标准键盘)”,并且在右边的型号列表中选择“Japanese PS/2 Keyboard (106/109 Key)”,并点击“下一步”。此后,Windows将出现警告,提醒您是否要继续安装这个驱动程序,请选择“是”。紧接着,Windows将再次出现一个关于是否替换 PS/2 mouse port 设备的警告,请再次选择“是”。
稍等片刻后,将会出现“完全硬件更新向导”的画面。请先保存您的此时未完成的所有工作和程序,当您点击“完成”后,将会要求重新启动机器。
至此,日语的键盘布局的硬件配置部分修改完毕。重新启动机器后让我们进入软件配置部分。
在重新启动机器的过程中,让我们来回忆一下自己平时对输入法的各种使用体会吧。一般的方块文字输入系统都表现为两种使用状态。英语输入状态和方块文字输入状态。这里用中文的微软拼音输入法 2003 和日语的 Microsoft IME Standard 2002 来做例子。对于中文,是使用 shift 键来切换这两种状态,而对于日语是使用日语键盘特有的左上角 半角/全角 这个键来切换这两种状态的。
我们修改的目的,就是要在这两种输入法,总共四种输入状态中,把键盘的布局全部修改成日语键盘的布局方式。之前的硬件配置部分完成后,我们已经把您的计算机上日语的两种输入状态中,键盘布局修改成日语的模式了。如果您觉得没有必要修改中文的布局模式的话,到此为止就可以了。如果在中文输入的时候,对于键盘的分布和自己的输入结果有差异而感到不满的话,请继续看下去并按照我说的来修改。
好了,您的机算机应该重新启动完毕了吧。让我们继续软件部分的修改。
点击“开始”,点击“运行...”,输入“regedit”,并点击“确定”。进入注册表编辑器。
依顺序进入“HKEY_LOCAL_MACHINE”->“SYSTEM”->“ControlSet001”->“Control”->“Keyboard Layouts”。
在左边长长的列表中往下慢慢的拉,找到“00000804”,点击之后,双击右边的“LayourFile”,把其中的“KBDUS.DLL”修改成“KBDJPN.DLL”。这一步就是把中文输入法的英语输入状态下的键盘布局修改成日语的键盘布局模式。如果您愿意的话,可以把“Layout Text”修改成“中文(简体)-日式键盘”
然后继续回到左边,往下拉。找到“E00E0804”,重复上面的步骤,把右边的“LayourFile”修改成“KBDJPN.DLL”即可。这一步是把微软拼音输入法 2003的中文输入状态下键盘的布局模式修改成日语布局。
如果您使用的不是微软拼音输入法 2003,请参照下面的列表找到您适用的修改区域。如果没有找到,也没有关系,一般来说,简体中文输入法的区域,最后四位总是“0804”,很容易就可以找到的。
至此,所有的修改已经完毕,请重新启动您的计算机,您所做的修改会在重新启动会体现。
请注意,您的键盘将应为您所做的修改,而具有所有日语键盘的特性。包括直接按下“caps lock”切换大小写的功能将被日语键盘特有的同时按下“caps lock”+“shift”所替代。
输入法注册表区域参照
E00E0804 中文 (简体) - 微软拼音输入法 3.0 版(或微软拼音输入法 2003)
E0050804 中文 (简体) - 内码
E0040804 中文 (简体) - 智能 ABC
E0030804 中文 (简体) - 郑码
E0020804 中文 (简体) - 双拼
E0010804 中文 (简体) - 全拼
其他新开发的输入法都可以依此类推。
(补充)
E0200804 中文(简体)-谷歌拼音
2011年12月1日星期四
Why VisualVM cannot find Local Tomcat automatically ?
Tomcat is also a Java application, isn’t it? So when I launch VisualVM (when local Tomcat is already running), the icon cat must be there!
However, when I use JDK 6 (>=6u23), I cannot see it.
According to Internet blogs and disscussion, the reason is that:
Tomcat (>= Version 6) does not write its “TEMP File” into system default temp folder. It uses the private folder!
In contrast, monitoring tools (like JConsole, VisualVM, etc.) tend to find local applications by checking temperory files in “SYSTEM DEFAULT FOLDER”. So that is why monitoring tools cannot find Tomcat.
There are two solutions:
1, Build Remote Connection in Monitoring tools. By treating “disappeared” Tomcat as a “Remote” java application, the monitoring tools no longer need the “TEMP FILE” of local Tomcat.
If you choose this solution, you need to:
(a) defind customized variables in Tomcat’s configuration folder (e.g. %Tomcat_Root%/bin) as follows:Here pay attention that the separator between different options is a single SPACE, rather than any other character or Line-Change.
(b) then you can start Tomcat by run the “startup.bat” (// ”startup.sh” for linux)
(c) create new “Add JXM Connection”, input the configuration string as “localhost:9090”. // here the port should be same as what you defined in “setenv.bat” file. Then click OK. You will find a “Remote” Icon cat appears.
2, You can also choose to solve the “TEMP FILE MISSING” problem. If you choose this, you need to:
(a) create the “setenv.bat” file in %Tomcat_Root%/bin folder, and then add the following variable.
(b) then you can start your Tomcat again. You will see the Icon Cat appear now.
2011年11月28日星期一
Why VisualVM 1.3.3 cannot do CPU Time Sampling
Today I installed VisualVM 1.3.3 (the newest released version from visualvm.java.net). However, it appears that CPU Sampling Function is automatically disabled.
When I debug the VisualVM 1.3.3 through NetBeans, it appears the following exception information.
I searched the resource code and find that :
- in VisualVM 1.3.3, three new source files are added in plugin folder “Sample/CPU”. It appears that some detailed CPU usage information is available in the 1.3.3 version.
- in the new-added source “ThreadsCPU.java”, line 55. It writes that method “getThreadCpuTime” of ThreadMXBean is called, and expected return type is “long[]”. In contrast, in VisualVM 1.3.2 and former version, there is no such new code.
Interestingly, I found that there is “//NOI18N” comment in the end of the code like follows:
So let’s have a look at the javaDoc of JDK itself.
If we open the javadoc of OpenJDK, we can easily find that there is no such method in ThreadMXBean:
but if we open Sun Jdk (newer than 6u25), we can find the following hint:
So if users’ JDK is OpenJDK, or older version JDK (< 6u25), the “NoSuchMethodException” will definitely occured!
But the problem is WHY THE WHOLE CPU SAMPLING FUNCTION IS DISABLED ?
Let’s look at where the ThreadsCPU.java is invoked. It is in SampleImpl.java, line 551. Here we can easily find that the try-catch structure is so strong that normal logics are broken down.
try {
tcpu.getThreadsCPUInfo();
} catch (Exception ex) {
tcpu = null;
throw new RuntimeException(ex);}
So let’s make some tiny change to it, as follows:
OK, we are DONE!
Now if users’ JDK does not support new getThreadCpuTime method, users can AT LEAST use functions same with VisualVM (Version 1.3.2).
2011年11月25日星期五
How to browse the fields of WMI Classes
We can use SQL-like language to query system-level information (including performance information) by WMI.
But the problem is that new users do not know what the definition of 'SQL Tables'. What kind of "Columns" do they have?
So it is very necessary for new users to check the content of each WMI classes.
******************************************************************************
Step 1: Run WBEMTEST.
Step 2: Click the [Connection] Button, then you can see a jump-out dialog.
But the problem is that new users do not know what the definition of 'SQL Tables'. What kind of "Columns" do they have?
So it is very necessary for new users to check the content of each WMI classes.
******************************************************************************
Step 1: Run WBEMTEST.
(You can invoke it by inputting the name into Windows Start -> Run Dialog Box)
Step 2: Click the [Connection] Button, then you can see a jump-out dialog.
Step 3: In this [Connection] Dialog, change the Namespace (in the textfield) to "root\cimv2", and then click [Connect]. Then you find yourself retured back.
Step 4: Now click the [Enum Classes] button. And then choose [Recursive] Radio button with leaving the main text field blank. Then click [OK].
Step 5: Now you can see that all WMI Classes (e.g. Win32_System) are listed in the new Jump-out window. Now you can browse them using the scollbar.
Step 6: If you want to check the fields of certain class, just double-click it from the list. then you can browse its detailed information in a new window.
Use PerfMon to Find why your Windows Computer is Slow
I found a valuable post in other people's blog.
I think the knowledge about PerfMon (a tool embedded in Windows, majoring in System Performance Browse) can help you determine the bottleneck of your PC.
The Original Link is :http://adminfoo.net/2007/04/windows-perfmon-top-ten-counters.html
*********************************************************************************
Windows Perfmon: The Top Ten Counters
One of the things I love about Windows is Performance Monitor a/k/a PerfMon. It's an amazing tool that goes far too often unused - and when it does get used, it is often misinterpreted. So today I'm going to take you on the nickel tour through PerfMon, and the ten counters most valuable to determining overall system health and activity.
To open PerfMon, just go to the Start Menu, choose Run and type perfmon.
Bottleneck analysis
The most common use of PerfMon is to answer the burning question: why is my system running slow?
With the five performance counters listed below, you can quickly get an overall impression of how healthy a system is - and where the problems are, if they exist. The idea here is to pick counters that will be at low or zero values when the system is healthy, and at high values when something is overloaded. A 'perfectly healthy' system would show all counters flatlined at zero. (Perfection is unattainable, so you'll probably never see all of these counters flatlined at zero in real life. The CPU will almost always have a few items in queue.)
Pay close attention to the scale column! Perfmon attempts to automatically pick a scale that will magnify or reduce the counter enough to produce a meaningful line on the graph ... but it doesn't always get it right. As an example, Perfmon often chooses to multiply Disk Queue Length by 100. So, you might think the disk queue length is sustained at 10 (bad!) when in fact it's really at 1 (good). If you're not sure, highlight the counter in the lower pane, and watch the Last and Average values just below the graph. In the screenshot below, I modified all of the counters to a scale value of 1.0, then changed the graph's vertical axis to go from 0-10.
To change graph properties (like scale and vertical axis as discussed above), rightclick the graph and chooseProperties. There are a number of things to customize here ... fiddle with it until you have a graph that looks good to you.
To get a more detailed explanation of any counter, rightclick anywhere in the perfmon graph and choose Add Counters. Select the counter and object that you are curious about, and click the Explain button.
This screenshot shows a very lightly-loaded XP system, with the Memory\Pages Input/Sec counter highlighted:
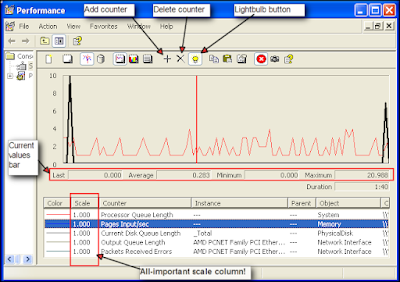
All we see here is the Proccessor Queue Length hovering between 1 and 4, and two short spikes of Pages Input/Sec. All other counters are flatlined at zero, which is easy to check by highlighting each of them and watching the values bar underneath the graph. This is a happy system - no problems here!
But if we saw any of the above counters averaging more than 2-4 for long periods of time (except Processor Queue Length: don't worry unless it's above 10 for long lengths of time), we'd be able to conclude that there was a problem with that subsystem. We could then drill down using more detailed counters to see exactly what was causing that subsystem to be overloaded. More detailed analysis is beyond the scope of this article, but if there's enough interest I could do a second article on that. Leave a comment if you're interested!
General activity counters
Well, the system is healthy - and that's good ... but how hard is it working? Is the processor workin' hard, or hardly workin'? How much RAM is in use, how many bytes are being written to or read from the disk or network? The following counters are a good overview of general activity of the system.

And ... that's all for now. Hopefully this quick show-and-tell has given you enough information to use PerfMon more usefully in the future!
To open PerfMon, just go to the Start Menu, choose Run and type perfmon.
Bottleneck analysis
The most common use of PerfMon is to answer the burning question: why is my system running slow?
With the five performance counters listed below, you can quickly get an overall impression of how healthy a system is - and where the problems are, if they exist. The idea here is to pick counters that will be at low or zero values when the system is healthy, and at high values when something is overloaded. A 'perfectly healthy' system would show all counters flatlined at zero. (Perfection is unattainable, so you'll probably never see all of these counters flatlined at zero in real life. The CPU will almost always have a few items in queue.)
- Processor utilization
- System\Processor Queue Length - number of threads queued and waiting for time on the CPU. Divide this by the number of CPUs in the system. If the answer is less than 10, the system is most likely running well.
- Memory utilization
- Memory\Pages Input/Sec - The best indicator of whether you are memory-bound, this counter shows the rate at which pages are read from disk to resolve hard page faults. In other words, the number of times the system was forced to retreive something from disk that should have been in RAM. Occasional spikes are fine, but this should generally flatline at zero.
- Disk Utilization
- PhysicalDisk\Current Disk Queue Length\driveletter - this is probably the single most valuable counter to watch. It shows how many read or write requests are waiting to execute to the disk. For single disks, it should idle at 2-3 or lower, with occasional spikes being okay. For RAID arrays, divide by the number of active spindles in the array; again try for 2-3 or lower. Because a shortage of RAM will tend to beat on the disk, look closely at the Memory\Pages Input/Sec counter if disk queue lengths are high.
- Network Utilization
- Network Interface\Output Queue Length\nic name - is the number of packets in queue waiting to be sent. If there is a sustained average of more than two packets in queue, you should be looking to resolve a network bottleneck.
- Network Interface\Packets Received Errors\nic name - packet errors that kept the TCP/IP stack from delivering packets to higher layers. This value should stay low.
Pay close attention to the scale column! Perfmon attempts to automatically pick a scale that will magnify or reduce the counter enough to produce a meaningful line on the graph ... but it doesn't always get it right. As an example, Perfmon often chooses to multiply Disk Queue Length by 100. So, you might think the disk queue length is sustained at 10 (bad!) when in fact it's really at 1 (good). If you're not sure, highlight the counter in the lower pane, and watch the Last and Average values just below the graph. In the screenshot below, I modified all of the counters to a scale value of 1.0, then changed the graph's vertical axis to go from 0-10.
To change graph properties (like scale and vertical axis as discussed above), rightclick the graph and chooseProperties. There are a number of things to customize here ... fiddle with it until you have a graph that looks good to you.
To get a more detailed explanation of any counter, rightclick anywhere in the perfmon graph and choose Add Counters. Select the counter and object that you are curious about, and click the Explain button.
This screenshot shows a very lightly-loaded XP system, with the Memory\Pages Input/Sec counter highlighted:

All we see here is the Proccessor Queue Length hovering between 1 and 4, and two short spikes of Pages Input/Sec. All other counters are flatlined at zero, which is easy to check by highlighting each of them and watching the values bar underneath the graph. This is a happy system - no problems here!
But if we saw any of the above counters averaging more than 2-4 for long periods of time (except Processor Queue Length: don't worry unless it's above 10 for long lengths of time), we'd be able to conclude that there was a problem with that subsystem. We could then drill down using more detailed counters to see exactly what was causing that subsystem to be overloaded. More detailed analysis is beyond the scope of this article, but if there's enough interest I could do a second article on that. Leave a comment if you're interested!
General activity counters
Well, the system is healthy - and that's good ... but how hard is it working? Is the processor workin' hard, or hardly workin'? How much RAM is in use, how many bytes are being written to or read from the disk or network? The following counters are a good overview of general activity of the system.
- Processor utilization
- Processor\% Processor Time\_Total - just a handy idea of how 'loaded' the CPU is at any given time. Don't confuse 100% processor utilization with a slow system though - processor queue length, mentioned above, is much better at determining this.
- Memory utilization
- Process\Working Set\_Total (or per specific process) - this basically shows how much memory is in the working set, or currently allocated RAM.
- Memory\Available MBytes - amount of free RAM available to be used by new processes.
- Disk Utilization
- PhysicalDisk\Bytes/sec\_Total (or per process) - shows the number of bytes per second being written to or read from the disk.
- Network Utilization
- Network Interface\Bytes Total/Sec\nic name - Measures the number of bytes sent or received.

And ... that's all for now. Hopefully this quick show-and-tell has given you enough information to use PerfMon more usefully in the future!
2011年11月24日星期四
How to run VisualVM in Ubuntu
Today I spent one hour struggling with running VisualVM in Ubuntu.
I am new hand in Linux OS. So I hope my experience can help people in similar conditions.
First, of course, you need to install Java Development Kit (JDK) into your ubuntu since it is not defauly installed.
The command I used is:
After installation, the main code and resources of VisualVM can be found in default installation path (in my PC, it is “usr/lib/visualVM”), and the short cut start file (“jvisualvm”) will be created in “usr/lib”.
Third, before you directly run VisualVM, you MUST edit the auto-generated script file “jvisualvm” to match the java environment.
I hate using VI in Linux because I cannot remember hotkeys. So I installed leafpad (a simple notepad software) to edit txt files.
The default content of script file MUST be changed, unless you cannot launch VisualVM successfully.
There is a section of code (as follows) in the file. (maybe starts from line 12). It means that the system checks all given paths (from [path1] to [path n]), if any path includes file “javac” in sub-folder “[path]/bin”, then VisualVM will use this path as “jdkhome”.
So here lies the problem.
WHEN YOU INSTALL VISUALVM, the content of this script file will not be updated according to your own JAVA ENVIRONMENT.
so I changed the this section of code as follows to solve the problem (by inserting my JDK path into condition part):
DO NOT FORGET TO SAVE THE FILE!
DO NOT FORGET TO REOPEN THE FILE TO CHECK YOUR CHANGE!
Now, you can successfully invoke VisualVM.
Enjoy monitoring!
I am new hand in Linux OS. So I hope my experience can help people in similar conditions.
First, of course, you need to install Java Development Kit (JDK) into your ubuntu since it is not defauly installed.
The command I used is:
Second, it is time to install VisualVM.
VisualVM is free and open source software. If you install Sun-JDK, it is already binded. If you installed open-JDK like me, you need to download and install it independently.
After installation, the main code and resources of VisualVM can be found in default installation path (in my PC, it is “usr/lib/visualVM”), and the short cut start file (“jvisualvm”) will be created in “usr/lib”.
Third, before you directly run VisualVM, you MUST edit the auto-generated script file “jvisualvm” to match the java environment.
I hate using VI in Linux because I cannot remember hotkeys. So I installed leafpad (a simple notepad software) to edit txt files.
The default content of script file MUST be changed, unless you cannot launch VisualVM successfully.
There is a section of code (as follows) in the file. (maybe starts from line 12). It means that the system checks all given paths (from [path1] to [path n]), if any path includes file “javac” in sub-folder “[path]/bin”, then VisualVM will use this path as “jdkhome”.
WHEN YOU INSTALL VISUALVM, the content of this script file will not be updated according to your own JAVA ENVIRONMENT.
so I changed the this section of code as follows to solve the problem (by inserting my JDK path into condition part):
DO NOT FORGET TO REOPEN THE FILE TO CHECK YOUR CHANGE!
Now, you can successfully invoke VisualVM.
Enjoy monitoring!
2011年10月27日星期四
A Visual Guide to Version Control
I found a pretty well blog from Internet. So I copied it here.
Thanks to the original author of this post! Thanks! (Original URL : A Visual Guide to Version Control
------------------------------------------------------------------------------------------------------------------------------------------------------------------------------------------------------
A Visual Guide to Version Control
Version Control (aka Revision Control aka Source Control) lets you track your files over time. Why do you care? So when you mess up you can easily get back to a previous working version.
You’ve probably cooked up your own version control system without realizing it had such a geeky name. Got any files like this? (Not these exact ones I hope).
- KalidAzadResumeOct2006.doc
- KalidAzadResumeMar2007.doc
- instacalc-logo3.png
- instacalc-logo4.png
- logo-old.png
It’s why we use “Save As”. You want the new file without obliterating the old one. It’s a common problem, and solutions are usually like this:
- Make a single backup copy (Document.old.txt).
- If we’re clever, we add a version number or date: Document_V1.txt, DocumentMarch2007.txt
- We may even use a shared folder so other people can see and edit files without sending them over email. Hopefully they relabel the file after they save it.
So Why Do We Need A Version Control System (VCS)?
Our shared folder/naming system is fine for class projects or one-time papers. But software projects? Not a chance.
Do you think the Windows source code sits in a shared folder like “Windows2007-Latest-UPDATED!!”, for anyone to edit? That every programmer just works in a different subfolder? No way.
Large, fast-changing projects with many authors need a Version Control System (geekspeak for “file database”) to track changes and avoid general chaos. A good VCS does the following:
- Backup and Restore. Files are saved as they are edited, and you can jump to any moment in time. Need that file as it was on Feb 23, 2007? No problem.
- Synchronization. Lets people share files and stay up-to-date with the latest version.
- Short-term undo. Monkeying with a file and messed it up? (That’s just like you, isn’t it?). Throw away your changes and go back to the “last known good” version in the database.
- Long-term undo. Sometimes we mess up bad. Suppose you made a change a year ago, and it had a bug. Jump back to the old version, and see what change was made that day.
- Track Changes. As files are updated, you can leave messages explaining why the change happened (stored in the VCS, not the file). This makes it easy to see how a file is evolving over time, and why.
- Track Ownership. A VCS tags every change with the name of the person who made it. Helpful for
blamestorminggiving credit. - Sandboxing, or insurance against yourself. Making a big change? You can make temporary changes in an isolated area, test and work out the kinks before “checking in” your changes.
- Branching and merging. A larger sandbox. You can branch a copy of your code into a separate area and modify it in isolation (tracking changes separately). Later, you canmerge your work back into the common area.
Shared folders are quick and simple, but can’t beat these features.
Learn the Lingo
Most version control systems involve the following concepts, though the labels may be different.
Basic Setup
- Repository (repo): The database storing the files.
- Server: The computer storing the repo.
- Client: The computer connecting to the repo.
- Working Set/Working Copy: Your local directory of files, where you make changes.
- Trunk/Main: The primary location for code in the repo. Think of code as a family tree — the trunk is the main line.
Basic Actions
- Add: Put a file into the repo for the first time, i.e. begin tracking it with Version Control.
- Revision: What version a file is on (v1, v2, v3, etc.).
- Head: The latest revision in the repo.
- Check out: Download a file from the repo.
- Check in: Upload a file to the repository (if it has changed). The file gets a new revision number, and people can “check out” the latest one.
- Checkin Message: A short message describing what was changed.
- Changelog/History: A list of changes made to a file since it was created.
- Update/Sync: Synchronize your files with the latest from the repository. This lets you grab the latest revisions of all files.
- Revert: Throw away your local changes and reload the latest version from the repository.
Advanced Actions
- Branch: Create a separate copy of a file/folder for private use (bug fixing, testing, etc). Branch is both a verb (“branch the code”) and a noun (“Which branch is it in?”).
- Diff/Change/Delta: Finding the differences between two files. Useful for seeing what changed between revisions.
- Merge (or patch): Apply the changes from one file to another, to bring it up-to-date. For example, you can merge features from one branch into another. (At Microsoft this was called Reverse Integrate and Forward Integrate)
- Conflict: When pending changes to a file contradict each other (both changes cannot be applied).
- Resolve: Fixing the changes that contradict each other and checking in the correct version.
- Locking: Taking control of a file so nobody else can edit it until you unlock it. Some version control systems use this to avoid conflicts.
- Breaking the lock: Forcibly unlocking a file so you can edit it. It may be needed if someone locks a file and goes on vacation (or “calls in sick” the day Halo 3 comes out).
- Check out for edit: Checking out an “editable” version of a file. Some VCSes have editable files by default, others require an explicit command.
And a typical scenario goes like this:
Alice adds a file (list.txt) to the repository. She checks it out, makes a change (puts “milk” on the list), and checks it back in with a checkin message (“Added required item.”). The next morning, Bob updates his local working set and sees the latest revision oflist.txt, which contains “milk”. He can browse the changelog or diff to see that Alice put “milk” the day before.
Visual Examples
This guide is purposefully high-level: most tutorials throw a bunch of text commands at you. Let’s cover the high-level concepts without getting stuck in the syntax (the Subversion manual is always there, don’t worry). Sometimes it’s nice to see what’s possible.
Checkins
The simplest scenario is checking in a file (list.txt) and modifying it over time.
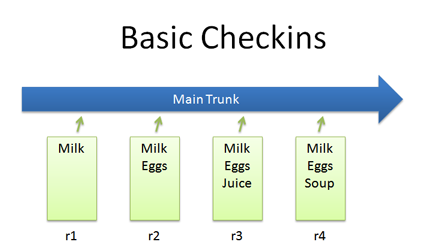
Each time we check in a new version, we get a new revision (r1, r2, r3, etc.). In Subversion you’d do:
svn add list.txt
(modify the file)
svn ci list.txt -m "Changed the list"
The -m flag is the message to use for this checkin.
Checkouts and Editing
In reality, you might not keep checking in a file. You may have to check out, edit and check in. The cycle looks like this:
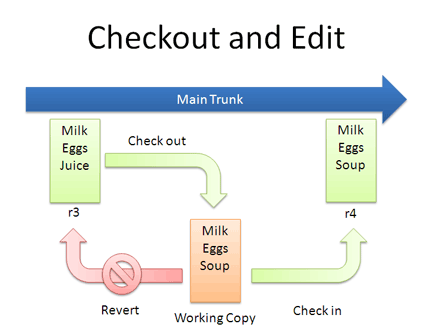
If you don’t like your changes and want to start over, you can revert to the previous version and start again (or stop). When checking out, you get the latest revision by default. If you want, you can specify a particular revision. In Subversion, run:
svn co list.txt (get latest version)
...edit file...
svn revert list.txt (throw away changes)

svn co -r2 list.txt (check out particular version)
Diffs
The trunk has a history of changes as a file evolves. Diffs are the changes you made while editing: imagine you can “peel” them off and apply them to a file:
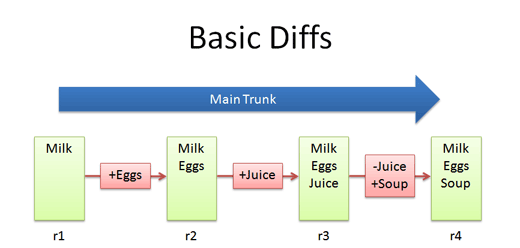
For example, to go from r1 to r2, we add eggs (+Eggs). Imagine peeling off that red sticker and placing it on r1, to get r2.
And to get from r2 to r3, we add Juice (+Juice). To get from r3 to r4, we remove Juice and add Soup (-Juice, +Soup).
Most version control systems store diffs rather than full copies of the file. This saves disk space: 4 revisions of a file doesn’t mean we have 4 copies; we have 1 copy and 4 small diffs. Pretty nifty, eh? In SVN, we diff two revisions of a file like this:
svn diff -r3:4 list.txt
Diffs help us notice changes (“How did you fix that bug again?”) and even apply them from one branch to another.
Bonus question: what’s the diff from r1 to r4?
+Eggs
+Soup
Notice how “Juice” wasn’t even involved — the direct jump from r1 to r4 doesn’t need that change, since Juice was overridden by Soup.
Branching
Branches let us copy code into a separate folder so we can monkey with it separately:
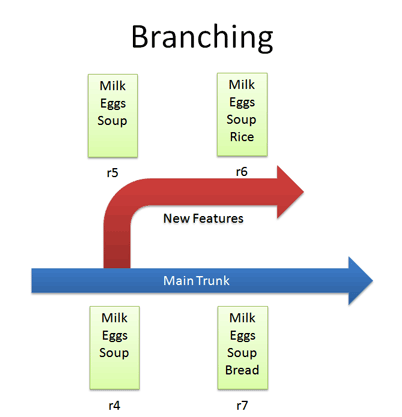
For example, we can create a branch for new, experimental ideas for our list: crazy things like Rice or Eggo waffles. Depending on the version control system, creating a branch (copy) may change the revision number.
Now that we have a branch, we can change our code and work out the kinks. (“Hrm… waffles? I don’t know what the boss will think. Rice is a safe bet.”). Since we’re in a separate branch, we can make changes and test in isolation, knowing our changes won’t hurt anyone. And our branch history is under version control.
In Subversion, you create a branch simply by copying a directory to another.
svn copy http://path/to/trunk http://path/to/branch
So branching isn’t too tough of a concept: Pretend you copied your code into a different directory. You’ve probably branched your code in school projects, making sure you have a “fail safe” version you can return to if things blow up.
Merging
Branching sounds simple, right? Well, it’s not — figuring out how to merge changes from one branch to another can be tricky.
Let’s say we want to get the “Rice” feature from our experimental branch into the mainline. How would we do this? Diff r6 and r7 and apply that to the main line?
Wrongo. We only want to apply the changes that happened in the branch!. That means we diff r5 and r6, and apply that to the main trunk:

If we diffed r6 and r7, we would lose the “Bread” feature that was in main. This is a subtle point — imagine “peeling off” the changes from the experimental branch (+Rice) and adding that to main. Main may have had other changes, which is ok — we just want to insert the Rice feature.
In Subversion, merging is very close to diffing. Inside the main trunk, run the command:
svn merge -r5:6 http://path/to/branch
This command diffs r5-r6 in the experimental branch and applies it to the current location. Unfortunately, Subversion doesn’t have an easy way to keep track of what merges have been applied, so if you’re not careful you may apply the same changes twice. It’s a planned feature, but the current advice is to keep a changelog message reminding you that you’ve already merged r5-r6 into main.
Conflicts
Many times, the VCS can automatically merge changes to different parts of a file. Conflictscan arise when changes appear that don’t gel: Joe wants to remove eggs and replace it with cheese (-eggs, +cheese), and Sue wants to replace eggs with a hot dog (-eggs, +hot dog).
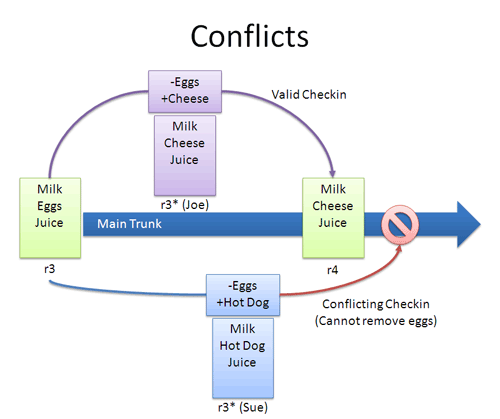
At this point it’s a race: if Joe checks in first, that’s the change that goes through (and Sue can’t make her change).
When changes overlap and contradict like this, the VCS may report a conflict and not let you check in — it’s up to you to check in a newer version that resolves this dilemma. A few approaches:
- Re-apply your changes. Sync to the the latest version (r4) and re-apply your changes to this file: Add hot dog to the list that already has cheese.
- Override their changes with yours. Check out the latest version (r4), copy over your version, and check your version in. In effect, this removes cheese and replaces it with hot dog.
Conflicts are infrequent but can be a pain. Usually I update to the latest and re-apply my changes.
Tagging
Who would have thought a version control system would be Web 2.0 compliant? Many systems let you tag (label) any revision for easy reference. This way you can refer to “Release 1.0″ instead of a particular build number:
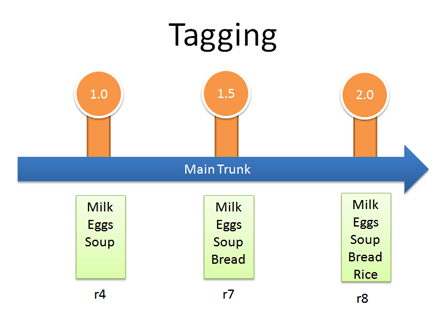
In Subversion, tags are just branches that you agree not to edit; they are around for posterity, so you can see exactly what your version 1.0 release contained. Hence they end in a stub — there’s nowhere to go.
(in trunk)
svn copy http://path/to/revision http://path/to/tag
Real-life example: Managing Windows Source Code
We guessed that Windows was managed out of a shared folder, but it’s not the case. Sohow’s it done?
- There’s a main line with stable builds of Windows.
- Each group (Networking, User Interface, Media Player, etc.) has its own branch to develop new features. These are under development and less stable than main.
You develop new features in your branch and “Reverse Integrate (RI)” to get them into Main. Later, you “Forward Integrate” and to get the latest changes from Main into your branch:
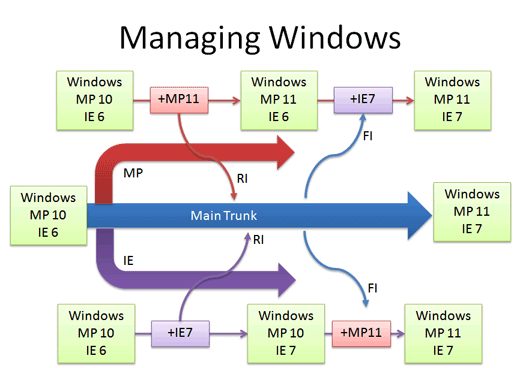
Let’s say we’re at Media Player 10 and IE 6. The Media Player team makes version 11 in their own branch. When it’s ready and tested, there’s a patch from 10 – 11 which is applied to Main (just like the “Rice” example, but a tad more complicated). This a reverse integration, from the branch to the trunk. The IE team can do the same thing.
Later, the Media Player team can pick up the latest code from other teams, like IE. In this case, Media Player forward integrates and gets the latest patches from main into their branch. This is like pulling in the “Bread” feature into the experimental branch, but again, more complicated.
So it’s RI and FI. Aye aye. This arrangement lets changes percolate throughout the branches, while keeping new code out of the main line. Cool, eh?
In reality, there’s many layers of branches and sub-branches, along with quality metrics that determine when you get to RI. But you get the idea: branches help manage complexity. Now you know the basics of how one of the largest software projects is organized.
Key Takeaways
My goal was to share high-level thoughts about version control systems. Here are the basics:
- Use version control. Seriously, it’s a good thing, even if you’re not writing an OS. It’s worth it for backups alone.
- Take it slow. I’m only now looking into branching and merging for my projects. Just get a handle on using version control and go from there. If you’re a small project, branching/merging may not be an issue. Large projects often have experienced maintainers who keep track of the branches and patches.
- Keep Learning. There’s plenty of guides for SVN, CVS, RCS, Git, Perforce or whatever system you’re using. The important thing is to know the concepts and realize every system has its own lingo and philosophy. Eric Sink has a detailed version control guidealso.
These are the basics — as time goes on I’ll share specific lessons I’ve learned from my projects. Now that you’ve figured out a regular VCS, try an illustrated guide to distributed version control.
2011年10月20日星期四
Why ANT terminates in Eclipse
It is very convenient to use ANT to compile our projects in Eclipse.
Also Eclipse has already integrated ANT, so users do not need to install ANT independently.
But sometimes, ANT will surprisingly terminates during Compiling process.
The reason is that ANT use UTF-8 as default encoding pattern.
But Java JDK/JRE will print out Locale Error and Warning Message during COMPILING process.
So sometimes, Eclipse integrated ANT cannot deal with the error/warning feedback correctly. The underground program throws "Runtime Exception", which lead ANT be unexpectedly Terminated.
There are two simple solutions.
- use CMD rather than Eclipse (ANT Plugin) to run ANT. Download independent ant, deploy it in your local environment, finish path configuration and then run it through command line mode. Now you can see what error/warning message happened.
- Add parameters when you run ANT in Eclipse. I forget the specific name of parameter. I remember that it redirects all error and warning message to normal system.out. Now you can also see the error message, though not in RED format.
2011年10月18日星期二
How to Use RSS in BlogSpot.com
In the bottom of the page, you will see the “订阅: 帖子 (Atom)” hint. Click it!
Or you can use the following url : RSS Default Address
Or you can use the following url : RSS Default Address
Read and Write XML in JDK1.4 with org.w3c.Dom
well, I admitted that org.w3c.dom (or DOM) is quite difficult to use than the popular dom4j (see here).
But sometimes, it might be problem for us to include new libraries in source code due to library confliction or license issues. For example, a big project is developed by various people independently. If all people use different libraries to parse xml, your product will finally turned out to be very complex to maintain.
So sometimes using the standard package in JDK (like JAXP) is the only choice, though difficult.
Here I demo some examples on how to use it for common purpose.
XMLIOUtility
With above code, it becomes easier for you to manipulate XML files.
Here is something important.
Usually, the output format of XML file by DOM is very ugly, with does not change lines or insert indent automatically. So you need to pay attention to the following lines in the method which print out xml files.
OK, I will also paste an example.
XMLResourceBundle class is convinient. But it is only supported by at least JDK1.5. Now I implemented a XMLResourceBundle class by JDK1.4 using DOM.
.The Class HintUtility did nothing but invoking System.out.println() to print messages.
订阅:
博文 (Atom)